Yesterday, a friend of mine and I spent the day in Portland, OR. We rode the train from Albany up & back. If you ever have the opportunity to ride a train somewhere, do it…it’s a great way to go.
On our way back and while in the middle of a conversation with another traveler, this week’s activity idea just popped into my head. This morning I tested it out and had a blast doing it. [More photos at the end of the instructions]

My First 'Splat' Painting
I call it ‘splat’ painting. The general idea is to take a damp paper towel, dip it in some watered-down paint and throw it onto some paper posted on a wall.
Have fun splatting! The Mandala Lady
Let’s Play…
What You’ll Need:
- poster paper, butcher paper, kraft paper, etc.
- any color poster paints or water-based paint that is non-toxic & cleans up easily…for my example I used the primary colors: red, yellow, and blue (Pro-Art Tempura Paints)
- bowls for the paint (one’s that are ok to mess up)
- sturdy paper towels
- latex or rubber gloves (only if you care about keeping your hands clean during the process…I wimped out and used them)
- water to water down the paint and to damped the paper towels
Preparation:
- find a place where you are able to make a big mess or a place where you can spread plastic tarps, old sheets, and/or old shower curtains. I used our shed in the backyard…adding any paint to it at all is an enhancement! Know that paint will splatter and that the paper towels will fall off the paper and land on the ground/floor. For this reason I highly recommend using water based paints.
- where comfortable old clothes that can take the paint splatters. This will be a messy process…but so much fun!
- put your paper up on the wall. I used push pins…our shed can take it. Use whatever you have available that will do the least amount of damage to walls. Painters/masking tape works well.
The Process:
- pour a color into a bowl…I started with yellow
- add some water to thin it out…you get more splatters this way
- damped a sheet of paper towel. I used a spray bottle to wet it
- clump up the paper towel, dip it into the paint and throw it at the paper…yes I said ‘throw it’
- retrieve the paper towel and throw it again
- add more paint to the paper towel as needed
- another technique is to slap the paper with the paper towel
- stand close to the paper
- hold an end of the paper towel
- slap it on to the paper
- slapping leaves a bigger, thinner area of paint, while throwing puts on globs of paint
- When you feel you have enough of that color, start at step one with the next color.
For my version I start with yellow, then red, then blue. Then I went back with more red, then more yellow.
This is one of those things that is beyond rules. Just play with the paint. Come up with your own way of applying the paint.
Other Options:
- Instead of paper towels, use sponges, or pieces of material or fabric.
- Place the paper on the floor instead of the wall.
HERE’S WHAT I DID…
When you ‘splat’ hard enough, the paper towel will stick to the paper. Splatting a wad of paper towel puts blobs of paint on it along with outside splatter. Note the splatters on the shed wall. oops!

Step 1: Spat Yellow onto the Paper
Here’s what it looks like before I do my first splat of red. I really load up the paper towel…bigger blobs & splatter that way 🙂

Step 2: Splat Red Paint...here's how it looks before I "splat"
Here you see the paper towel stuck to the paper. I got some great blobs & splatters on both splats.

Step 3: Splat Red on the Paper
In this shot you can see where I splatted and where I slapped (2nd technique described in step #7). Slapping spreads the paint out and in a more patterned way. If the paper towel has texture, which mine does, it shows up in the slapping. Notice the red ‘slap’ sections near the upper left and upper right.

Step 4: After Red and Yellow have been Splatted
Now it’s blue’s turn for splatting & slapping. The towel stayed on after one of the slaps.

Step 5: Splat Blue on the Paper
Once I finished with the blue, then I went back over the whole piece with more slapping of yellow and red. Tah-Dah! It was great fun. You’ll also see why I say this activity is very messy. This is the best the shed wall has ever looked…of course my husband has yet to see this 🙂
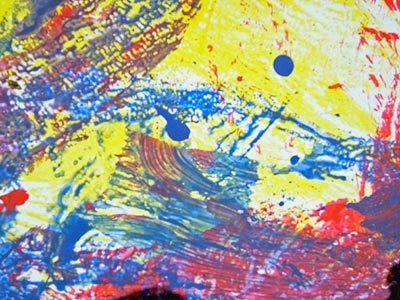
End Result
Now for some close-up shots. Most of this section shows slaps of all three colors. The red section shows more of the texture of the paper towel which had ridges on it.

Close-up #1
In this close up you see where smears occurred when I removed the paper towel from the paper, either quickly as part of a slap, or slowly when doing a full-on splat.

Close-up #2
In this close up you see slaps and splatter droplets.

Close-up #3
More splats, slaps and spatters.
Close-up #4

I am getting ready to splat my room with some freinds. what colors would be good to use??
that’s the beauty of this process…any color combination will give you something interesting. For instance you could have different shades of blue from very light to very dark and that would create a monochromatic painting. You could assign a different color for each friend. Really the sky’s the limit as to what you can do. The most important part of this (IMO) is to have fun with the process. If in the end it looks unappealing to you, you at least had fun doing it. If you like it when it’s done, then it’s a bonus 🙂
i think u should do blue and green i love those colors in my room i think they are the best mix. u probly would like it to.
Thanks for trying out my project…looks like your little artist had a blast doing it.